Pages

Friday, December 30, 2011

In with the New...

Well it is almost 2012 and I do not have big plans for New Years but I never really liked going out on the most insane night of the year anyway!  I do have a few Resolutions for the upcoming year; mainly to cook more homemade meals and eat out/order less.  I also want to (as always) loss weight.  I have a few new ideas on how to do it this year so hopefully I am successful.  Curves is a big part of it as are the previously mentioned home cooked meals.  I wanted to make a couple other changes too, I am going to try to cut out pop (even the diet kind) for 3 months and order tea at Starbucks instead of Hot Chocolate.

Well we will see how I do but in the meantime I have a little Sneek Peek for you ... The Sale-a-bration and Occasions Mini will be hitting the mailboxes soon (if they have not already) and I have a few cards to show you that I made while playing around with my new goodies. 

The new Framelits Dies are to-Die-for (haha) and this Labels Die is great for adding layers and dimension to any project.  Of course there is a Stamp set to go with it so there are literally hundreds of great ideas with this one.  There are also a super cute suite of products from the Sale-a-bration mini that co-ordinate wonderfully!


There are so many wonderful new products to enjoy coming up soon I it will be as hard for you to decide as it was for me.  A great new flower punch and some really fun stamp sets.  I am loving how the new In colors coordinate with the old and the DSP is really delicious!


Well I hope you like the cards and I hope you have a wonderful New Year!

Add a comment letting me know what your resolutions are I would love you hear from you.

Thursday, December 22, 2011

We Wish You A Merry Christmas ...

I hope everyone is ready for Christmas; I am almost totally done and ready to go.  School got out today at 1245 and Jillian is off for 2 weeks;  Megan still has one more day but tomorrow is her school's Christmas concert so we are excited to see that.   Every year one of my biggest Christmas Challenges is what to give all of the wonderful Teachers in my Childrens lives.  I always give gift cards to Starbucks or Chapters so somewhere like that but it's all in the presentation is it not?

This year I found this wonderful video tutorial for this great gift card/chocolate holder and I really enjoyed making these.   For the tutorial by Glenda Calkins click here.

On the Left is the front and on the right is how it looks when it is open.  As you can see there is a space for chocolates and for the gift card.


I made this one for my daughters grade 2 Teacher and also for the Teacher's aid I gave a little something too...
On these I used the Holly Berry DSP and made a lolly and put a punch art pine cone and needles.  I filled the Milk carton box with goodies.   Below you can see the others I made for my younger daughter's pre-school teachers.
The fronts of these are similar to the card I posted on Nov. 26. I loved the look so much I used it on these little boxes too.  


The final Teacher's gift was for Jillian's Piano Teacher.  She has many allergies so I did not want to give her chocolates.  I few months ago I made some of these post-it note holders for the office staff at Jillian's school so I thought it would be a wonderful way to present her with a gift card.  I really had fun making this one as I got to use that Holly Berry DSP again and I love it!
The front side holds the gift card and a pen and the other side holds the post-its.  A tutorial is available from Jill Hillard's Blog Click Here to access it.


Thanks for Looking.   I hope you have a wonderful, safe and happy Holiday Season.
  Take Care


Tuesday, December 13, 2011

NOEL

I started this project at the Fall Retreat in October but could not finish until we had that special visit with Santa.  Every year we visit the Big Guy in Red and I wanted to make a special frame where I could put the picture.  My goal is to scrapbook the old photos and showcase the new (although I am way behind on scrapbooking).  So when I saw these frames I thought I could have some fun with it.  The photo and the year are put in with 3M removable tape (I really hope it works!).  I used SU products with the exception of the frame and these cute little Christmas buttons I found at Michaels.

The Year was made on MDS (My Digital Studio) and every year I can create a new one and use the old one in my scrapbooking (I know, such lofty aspirations!!).
I have seen so many great fireplace cards this Christmas so I wanted to incorporate that in my frame.  I love the way it turned out.  I used the Bird punch for the flames and of course I used the new stocking punch!
Another great card trend this year is the Door card with a writhe.  I incorporated that too and added some Mica flakes to make it look snowy.  The felt accents in the mini are so cute and I had to add them to my project!
The felt Mittens are adorable!  I used the new silver glitter paper to add sparkle to the JOY! All the background paper is from the Holly Berry Bouquet Suite in the Holiday Mini.  I love it!


The NOEL is done with Chipboard and an old retired DSP from Stampin Up that my friend Melanie had on hand.  I added the buttons and some bling and I really like how it turned out.


Hope you like it!

Merry Christmas.
 

Thursday, December 1, 2011

O' Christmas Tree ...

To continue with my crafting craze from last week I have a couple more cards to show you.  The first is a variation from one I saw at the SU Convention in July.  I love the new Frames Textured Impressions Embossing folder (keep an eye out for Sale-a-bration cause it might just make an appearance!)  it adds great texture to any project.

I used Cherry Cobbler, Always Artichoke, Whisper White and Chocolate Chip. I just love the ribbon from this year's mini too.  So pretty!


These cards are my go to simple and fast Christmas cards.  I still love my Snowflake Spot stamp but any snowflake stamp will work.  This year I used the in colors and I love the combination;  Wisteria Wonder, Island Indigo and Pool Party.  (I realized after I downloaded the pictures I should have used a darker background!)

I have one more card to post but this on is "not" Stampin Up!!!  I actually bought a great Tim Holtz die/embossing folder combo from Scrapbookers on a whim (no my usual M.O.) and I love how fast and simple this card was plus you could easily us this for scrapbooking (if I ever actually got to my scrapbooking)

I did use SU paper as always, Whisper White, Garden Green and Cherry Cobbler.  I kind of wish I would have blinged it up a bit but maybe next time. 


Hope you like it!

Monday, November 28, 2011

Santa Clause is Coming to Town...

Ok one more quick post before I sign off.  Yesterday I made the trek to Market Mall for the kids annual visit with the man in Red.  They got all dolled up and were so excited. Jillian even wrote out her list so Santa would not forget!

Now I can avoid the mall in December!

Saturday, November 26, 2011

Less Than One Month Until Christmas!!

Well if you saw my post from last night you can see my phone does not take great pictures!  But as promised I have a few cards to show you and there will be more on the way soon!  My housework has been greatly ignored this week but I am enjoying myself.  Last night I finished the majority of my Christmas gift shopping so all I need to do now is start baking.

Here is a better picture of my cute Snowman and Penguin card (I love punch art, it's so much fun).
I hope you can see them a little better!  A Real Red background embossed with the Northern Flurry Embossing Folder is the background for my Punch art Snowman and Penguin.


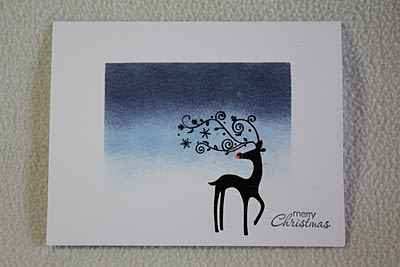
Next is one of my favourite cards this year. I cased it from Julia's Cards.   I sponged my background and added a light blue too but the idea is all hers. Simple and pretty with a bit of bling is totally my style and this card is all that, plus it uses one of my favourite stamps "Dasher". 

 I used Night of Navy and Bashful Blue Ink for the background and I used black embossing powder for Dasher to make him pop.  In the card on the left I added only one rhinestone (a red one) to his nose but below I added a bunch of clear ones to his antlers.
The Last card I will show you today is another one of my favourites this year!  I just bought the "Lovely as a Tree" Stamp set (yes it's been around for years but I was slow with this one)  I love it!!  This card was displayed on a video on the Stampin Connection website and I made some variations but overall the idea came from Catherine Pooler.


I stamped the trees in Always Artichoke and stamped off some ink on the background images so there was depth.  I used a layer of Artichoke for the frame and some  Espresso Twine for the bottom (I don't have the stamp set Catherine used for the sentiment)  I added the little bell because I felt it needed something and I LOVE those little jingle bells! You may not be able to see it in the photo but the trees are glittery.  I just used my glue pen and added some Dazzling Diamonds.  This fulfills all of my favourite elements. Simple, Pretty with a bit of Bling :)
 Thanks for Looking today.  Hope you have a wonderful weekend.

Friday, November 25, 2011

Blogging from my Phone

What a day and age we live in when I can post whatever I please from my phone :). I do love my I-phone! I have been hard at work in my craft room this week and will post something to help get you in the Christmas spirit tomorrow! Although if the mall was any indication today everyone already has their Christmas spirit on! Here,s a little preview...

Sunday, November 20, 2011

Beautiful Wedding ... Crazy weekend!

I can't believe how time is flying by .. November is more than half over and I have done very little for Christmas!   I only made 2 Christmas cards for this year (luckily I have a few left from last year) and I have at least 5 teachers gifts to make!   I was put behind by a trip to Saskatoon last weekend where we attended a wedding, while there Megan got the stomach flu so that was fun LOL.  Luckily she was not sick until after the wedding but it did delay our return a bit. 

Anyway back to the reason for this blog.  I made a card for the bride and groom of course and here it is. 

 I used Baja Breeze paper from SU and the pearls but the rest is random stuff I had laying around.  I love these cake cards they are just so pretty. 


Of course I could not wrangle my girls into a photo together! I think someone got the shot but it was not me so here they are just not together!

 
Thanks for Looking :)

Friday, November 4, 2011

Welcome to Winter...

If you live in Calgary you will know that today is looking very much like winter.  So in the spirit of things I want to show you a couple of the Christmas  cards I have been working on.  I am so far behind on Christmas already this year that I doubt I will be getting cards out to many people but we'll see.

I love glitter!  SU's new Sliver Glitter paper is so sparkly perfect that I had to use some on the new Stocking Punch that came out this season.  If you buy SU products at all this year's Christmas Mini had to just blow a hole in your budget there was so much great stuff!!  My reason for making this card was that I wanted to see if the gifts from the "Loads of Love" stamp set would fit in the top of the Stocking.  They do :).


As much as I love the "sparkle" of the last card I love the "simple" of this one!  I did not create this, I cased it off Splitcoast Stampers but I just had to recreate it because I thought it was so pretty.   Plus I got to use my new Frames embossing folder!


Well I hope you are keeping warm on this snowy day and thanks for looking.

Playing Catch Up

Hi all!  I hope you had a great Halloween! The weather held out for the big night and my kids raked in the candy.  Unfortunately I was very ill and could not celebrate my daughter's birthday the way I wanted to.  I did make it through the party the day before though!  So this post is all about playing catch up.  I have some cute treat bags to show off and the card I made for my daughter's birthday plus a cute shot of my girls all ready for trick or treating (the picture is not great as I was very ill but hey I'm a mom and all pictures of my kids are great to me)!

We had Jillian's Birthday party the day before Halloween and she had decided a long time ago that she wanted to have a crafting party (like mother, like daughter!!) and she wanted to give Hot Air Balloons for the treat bags.  So I took the challenge and this is what I came up with ...


I have to admit they really were super easy and very adorable.  Plus it solves the problem of everyone wanting a balloon to take home at the end of the day. We had a piñata so once they filled their zip-loc bags with loot I just placed them in the balloon base and I was done!! I used the SU Fancy Favour Die and Pennant punch. 

Jillian's Favourite things right now are Macaws.  She loves the movie Rio and she is always asking for bird stuffys.  So I tried to come up with a good birthday card for her.  I took a few punch art Ideas from Spiltcoast Stampers gallery and made the card below.  I love Michelle Zindorf's cards.  She is always using brayering techniques that totally astound me, so I incorporated that into the mix too.  I hope you like it. Jillian Loved it!

I found one last item at the Dollar Store (cost more than a dollar BTW) that just made Jillian's Day ...


By the next day I was Sick Sick Sick so I did not enjoy Halloween as much as I normally do but here is a shot of my two great kids all dressed up and on their way out the door!

Well I am caught up now :)  Hope you had a great Halloween and welcome to Winter...

Friday, October 28, 2011

More Halloween ... School Treats

I have two small kids who are both in School so this year I went simple and gave pencils to my oldest daughter's class and Rockets (in the US they are called Smarties) to my youngest daughter's class.  Below are the toppers I made using an old retired stamp set from SU called Booglie Eyes! I love this set and they were so fun to color with both pencil crayons and Copics. 
I also used some punch art using the owl builder punch from SU! I love punch art!

Happy Halloween!!

We love Halloween at our House!  Not only is it my oldest daughters birthday but it is fun and spooky and full of costumes and candy! We have our yard all ready for the trick-or-treaters on Monday and now we just hope it does not snow. 

Every spring and fall I go on a Paper Crafting Retreat hosted by my good friend Amber Chapman from Wildrose Paper Creations.  This past weekend I spent with some good friends, crafting up a storm and two of my favourite projects from the weekend are Halloween related.  The first was inspired from the "Village of Cuteness" class we took at the Stampin Up Convention this past Summer.  I have seen so many cute Spooky versions of this, that I had to make my own. 
I used the Pick Your Poison DSP from the SU mini.  I love this spooky paper, I got lots of ideas from some of the other Stampin Up Demos who have made these great little villages and I put my own spin on it where I could.


I added some Spider web to the roof of the orange house to look like smoke and some to the flower bed on the purple house along with some small spiders I found at the dollar store.  My favourite part is the skull in the window on the orange house! Hope you like them.

One of my other favourite projects from this past weekend was an idea I got at the SU Regional's in Edmonton last month.  Again I am using the Pick your Poison DSP from the mini and the Piece of Poison Stamp set which I WON at Regional's!!

This Spooky Banner was so fun and so easy.  I bought the Pick your Poison Quick Accents and it made things very simple.  Enjoy :)
 

New Blog ...

If you followed me on my Shaw webspace account (and not many did) then I hope you will enjoy my new blog here at blogger.  I looked into a few different blogs but this one was the easiest for me and had no cost! :)  Anyway my old posts are still at http://janetyates.shawwebspace.ca/ so please feel free to check out some of my older stuff. I have really enjoyed sharing my creations with my friends and I am hoping with this new blog I can share this fun hobby with more than just my friends.  So welcome and enjoy.

Janet Y

ps: positive comments are always welcome!

Related Posts Plugin for WordPress, Blogger...